Vivarium Plumbing Works :
We will use a lot of pipes , fittings and we will do some plumbing works .. which is essential for any vivarium hobbyist to know how to manage the water in the vivarium .. and that is due to the using of water a source of humidity , irrigation and then drinking water for the live creatures inside the vivarium such as plants , animals .. etc.
Water play a vital role to maintain the vivarium in a life quality conditions which reflect the tropical habitat .. every time you put more efforts to enhance the water quality and works you will be more closer to the real tropical areas and then keeping more or highly sensitive and difficult life creatures ..
hobbyists who successful in keep and breed difficult plant or animal in the vivarium they are actually successful in build their vivarium with highest standards to met that animal or plant requirements ..
we divided the water works into four groups of works :
1- Drainage system .
2- Misting system .
3- Fog system .
4- Water features systems .
Accordingly you should keep two or three of the above systems to met the tropical conditions ..


1. Fan control, either power supply, controller or timer.
2. Power supply. Low voltage DC I would guess.
3. Power supply or control for low pressure pump.
4. Low pressure pump for waterfall.
5. Liquid recovery tank, possibly desedimentation.
6. High pressure pump.
7. Solenoid valve.
8. Misting jets.
9. Fogger.
1- Drainage system :
drainage systems as we disscussed in the last pages .. is important , need to cut and drill the glass and acrylic tank to fit the pipes fittings and conect with pipes to the drain tank ..
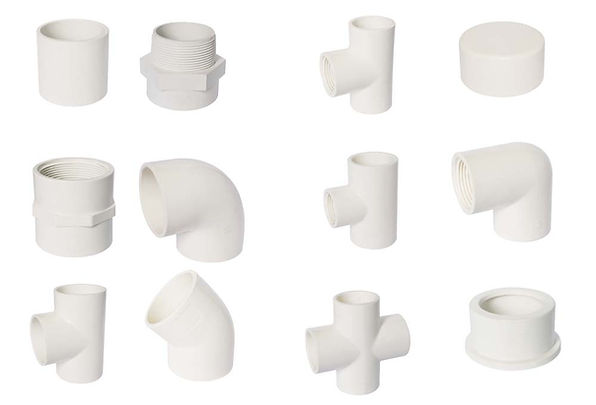
Some of the pipe fitting use in vivarium drainage .
Don't Panic .. the plumbing works is not diffecult .. Just need to know some roles and practice ?!!
- How to cut a circular holes in glass , plastic and wood ..
Normally we deal with glass , clear plastic ( Acrylic) and wood .. and all pipes is round .. So all our works will be rounded also ..
we cut a circular cutting which fit with outer diameter of the fitting ..
How To Drill a Hole in Glass Aquariums and vivariums :
Why drill the tank?
The amount of filtration needed in most vivarium systems is relatively large. The soil will be leaching out large volumes of solutes into your water that will build up as the water evaporates. The tea color quickly seen in most vivarium water features is due to the buildup of these solutes, primarily tannins in the wood and soil. These tannins and other organic acids in low concentrations are not a problem and can actually help by making available nutrients in the soil and water to your plants. However, in higher concentrations it will stunt plant growth, leave unsightly waterspots and can negatively affect aquatic/amphibian life. Because of this, newly setup vivariums with recirculating water need to have periodic water changes to remove the buildup of these solutes. These needed water changes can be done a multitude of ways, but the best option I’ve found is to use a canister filter or sump. But In order to use these filters you'll need a hole with a bulkhead in place.


What is a bulkhead and do I need one?
A bulkhead is a plastic piece that seals a drilled hole in glass or acrylic and forms a waterproof in/out water conduit. By putting one of these into your tank you can easily plumb in a basic on/off ball valve which can be used to drain your tank easily. If you have a design without a recirculating water supply it is advised to use one these to allow excess misting water to passively drain into a collecting bucket to prevent soil flooding. Bulkheads are designed to form a tight seal against the glass and when used properly can prevent leaking despite high water pressures. While it would be possible to just silicone a tube into a hole rather than use a bulkhead, a silicone blob will not hold up to the kinds of pressure/abuses that a bulkhead will.

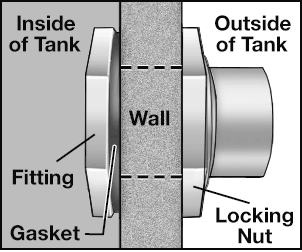


Bulk head is a pipe fittings come with two pieces and work as a joint device between the outside and inside the tank .. it can be work with all tanks ( pools , aquariums , vivariums and paludariums , waterfalls and fountains )
It is come with different materials , sizes , colors .. etc ..
This type is not thresded from inside .. you can connect the pipe with the ouside or your glue the pipe and joint inside .
This type is threaded from inside and outside - work with threaded pipes and fitting only - You Can Not use glue here to join the pipes ( Normally we use the UPVC cement to join the pipes ) .
Above is a drawing describe how to connect the bulkhead and the rubber or seal which will stop any leak of water to outside ..
A product review :
courtesy to : www.marine depot .com
Standard Threaded Bulkhead Fitting - 1/2 inch
Standard Threaded Bulkhead Fitting - 1/2 inch Information
Size: 1/2"
Hole Size: 1 1/4"
This bulkhead is threaded on the side that is flanged (where you screw in a strainer) and slip on the back side (where you can glue in a PVC pipe).


Reverse Standard Threaded Bulkhead Fitting (ABS) - 3/4 inch Slip x 3/4 inch FPT
Reverse Standard Threaded Bulkhead Fitting (ABS) - 3/4 inch Slip x 3/4 inch FPT Information
Standard ¾” slip x thread ABS bulkhead by CPR Aquatic.
Specifications
-
Fits standard ¾” pipe and slip fittings
-
Entire length: 2”
-
Flange diameter: 2”
-
Required hole size: 1 3/8”
-
This bulkhead has a slip fit on the inside of the flange side and is threaded on the inside of the stem side. A ¾” PVC pipe or other ¾” slip fittings can be glued on the inside of the flange side, while a ¾” MPT threaded fitting can be screwed into the inside of the stem side.

the rubber or seal to avoid the water leak ..
Note : It is important to know that the threading fittings use with pressure pipes ( Pipes come from Pumps and supplied to vivarium , aquarium or any pool ) .
While the glued pipes ( Using PVC cement - If the material manufactured from PVC or UPVC - Other materials need other adhesives like PE ( Polyethylene , or ABS , Polystyrene , .. etc ) these method used with drain pipes not pressure pipes .
In order to put in a bulkhead, your aquarium glass/acrylic needs to have a hole in it. For acrylic tanks this is usually not too difficult as basic hole drill bits used for wood will also work for thin acrylic. However for glass, specialized tools and procedures need to be used. I present the method I use here.
Bulkheads come in different sizes and styles. The thread / slip refers to the interior of the bulkhead. If it's threaded you can screw in male connectors of the same diameter. If its slip you need to glue in PVC piping. I prefer threaded as it is easily removable, however you do often need plumbers tape to make a proper seal.
Other types of bulk head .. can be connected with flexiable pipe ..
Before You Start :
Drilling glass is loud, challenging, and can be dangerous if you are not careful. The easiest and safest way to drill your tank is to go to a local aquarium specialty store and have them drill it for you. Many will do for somewhere between $15-$20 per hole. As this can become expensive pretty quick, doing it yourself can help save you money on multiple builds. A key thing to remember is that this method is only able to drill non-tempered glass. If there is a sticker on the aquarium, usually on the bottom, that says “do not drill” or “tempered” or anything of that sort, don’t drill the tank. Most 55 gallon and lower aquariums are not tempered along with any of the ZooMed/Exo-Terra cages. However if you are not certain, it's best to look up online or call the manufacturer to see if their tanks use tempered glass.
Safety:
Drilling glass can be dangerous as you will be using a power drill or drill press and glass. Broken glass is very sharp, especially when pressure and high-speed power tools are involved. Wear safety goggles and do this in a place where broken glass will not be a major problem if you break your tank. Use common sense and go slow, drilling can take a while.

Materials :
-Power Drill or Drill Press
-Proper Size Steel or Diamond Glass-Drilling Bit
-Plumbers Putty or other waterproof clay
-Carbide Powder Drilling Compound
-Water
-Eye Protection
-Steady Hand or Drill Press
- Patience
-Bulkhead
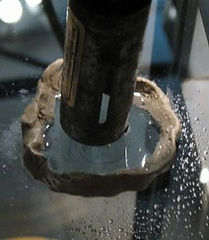
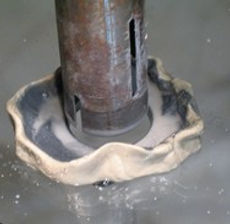
2. Orient the tank such that the hole is on the top and make a dam of clay around the area to be drilled. It’s a good idea to put just below the hole a catch bucket for the glass piece and liquid/carbide.
Details :
1. Using a marker determine roughly where you want your bulkhead to go. Be sure to leave enough space for the bulkhead from the aquarium edges and trim.

3. Add a few spoonfuls of carbide powder into the dam along with some water. You want a soupy mix.
4. Using a steady hand or drill press with the proper drilling bit, begin to spin the bit while applying pressure. You should hear an extremely loud and high pitch grinding noise.
5. Continue applying pressure while spinning the bit, occasionally lifting the bit a very small distance up to allow more of the carbide cutting powder to fill into the cutting trench you’ve created.
6. Continue until you see the water/carbide mix begin to pour out and keep applying pressure/spin until the hole is completely made. The amount of time needed to drill your aquarium will be dependent on the glass thickness, the speed of your drill, and the pressure you apply. Keep in mind too much pressure will break your glass.


Bulkhead Size to Hole Diameter Chart :
Bulkhead Size Hole in Glass Diameter
1/2" 1 1/8" Hole
3/4" 1 7/16" to 1 1/2" Hole
1" 1 3/4" Hole
1.5" 2 3/8" to 2 1/2" Hole
2" 2 7/8" to 3" Hole
Tips :
Unless you absolutley have to, avoid drilling the bottom of the aquarium. This is mainly because it makes moving it and putting it onto a flat surface very hard. After breaking an aquarium by it shifting off its supports and falling onto the bulkhead on the bottom, I will never drill the bottom again. Also many bottoms on larger aquariums are tempered.
In order to avoid the bit from "walking" all over before a groove is established you can start off drilling at an angle and then slowly coming vertical. I use a drill press so this is not often an issue, but is something to keep in mind if using a hand drill.
In order to avoid the bit from "walking" all over before a groove is established you can start off drilling at an angle and then slowly coming vertical. I use a drill press so this is not often an issue, but is something to keep in mind if using a hand drill.
Video : HOW TO: Drill A Glass Aquarium
DIY: How to drill glass aquarium!
Drilling a hole in a glass aquarium
Tools used : With the power driller we used a circular saw - Proper Size Steel or Diamond Glass-Drilling Bit .


come with different types and shapes sizes and materials select the one or the kit which is suitable with your works ..
How To Drill a Hole in Acrylic ( Plastic) Aquariums and vivariums :
Many DIY projects contain some acrylic components, knowing the right tools and techniques to use with acrylic will make DIY projects easier and more successful. One of the main problems in working with acrylic is that it does not transfer heat very well. Always keep this in mind when using tools with acrylic. Heat from a tool will put stress in the acrylic, which may cause crazing later. Remember to always wear safety glasses when cutting, routing or drilling acrylic, because small plastic chips can come flying off of the tool. It is best to begin with small projects to hone your skills before tackling major projects such as building a large tank.
Cutting Acrylic:
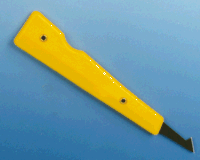
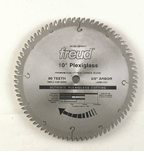
There are several ways to cut acrylic. A water-jet cutter is one of the best ways to do it, but a water-jet cutter is too expensive for most of our budgets. If there is a large machine shop locally they may have one. For a simple DIY acrylic project at home, a table saw or radial arm saw with a blade that is designed for cutting acrylic will work fine. A Freud LU-94-10 saw blade works very well for cutting acrylic, it has a triple chip grind, 3-degree hook and .110" kerf. McFeely's* carries the Freud LU-94-10 for $69.50. A zero clearance table saw insert and a pair of blade stabilizers would also help make better cuts by reducing blade vibration. Rockler* carries zero clearance table saw inserts for $21. Woodcraft (1-800-225-1153) carries blade stabilizers for $15. Always try to feed the acrylic into the saw blade at a steady rate, feeding it too fast or too slow may case the edge to melt. Many plastic shops use a panel saw to cut acrylic. It works well for the core of their business, but may not give a cut that is accurate enough for the precision required in the construction of a sump or tank. If you decide to have a plastic shop cut your acrylic, be sure to tell them that all of the sides must be the same width and length. Acrylic of 1/8" or less thickness may be scored like glass and snapped apart. This process may not, however, leave an edge that is flat enough for capillary gluing.
Drilling Acrylic :
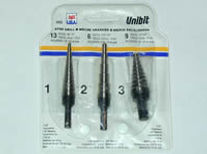
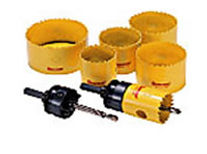
Heat is a problem when drilling acrylic because it causes the acrylic to melt and/or crack. Normal twist drills may chip and crack acrylic because of their tendency to lift and twist the acrylic rather than scraping it like a drill, which is designed for acrylic. A normal twist drill can be modified for use on acrylic with a bench grinder. Instructions for this modification can be found in the DIY section of mywebsite. Specially ground and polished drill bits designed just for acrylic are available from U.S. Plastic* in a few sizes. When using a drill bit made for acrylic there will be a long curly strand of acrylic created during the drilling process. The drill press should be set from 500 to1000 RPM. Always start and end the hole at a slow feed rate. Once the hole is started a feed rate of around 3 1/2" per minute works well. If a number of holes are being drilled, be sure and let the bit cool off frequently so as not to overheat the acrylic. Normal hole saws can be used to make large holes in acrylic, however it is very difficult to keep them from melting the tiny acrylic chips, causing the chips to stick to the side of the hole. A hole saw should be fine if you are making a hole to be used for a bulkhead fitting. It always helps to have a piece of plywood behind the acrylic being drilled so it has some backing when the drill bit cuts through. Remember: don't drill too close to the edge of a piece of acrylic as it has a tendency to crack towards the edge. A hole should not be drilled any closer than 1.5 times the diameter of the hole measured from the center of the hole to the edge of the acrylic. Unibits are also good for drilling thin acrylic because they only have one straight flute, which does a very nice job of scraping. Enco* carries them at a respectable discount.
Freud LU-94 sawblade Zero clearance Acrylic scoring knife
Tapping Acrylic :
A tap is used to cut the threads in a hole for a bolt. Normal taps made for steel may be used to tap acrylic. Simply drill the proper size hole and tap it. The tap will have a tapered end, thread it through the acrylic until the straight part of the tap comes out the backside of the acrylic. There are taps without a taper for tapping a blind hole (one which does not go completely through the acrylic). Taps may be found at most stores that carry tools. Tap drill tables for metal are different than those used for plastic. Beside normal fractional drill bits, there are also number bits which run from 1 to 60 and letter bits that run from A to Z. These drill bit sets can be found at most online tool stores like Grizzly* if they cannot be found locally.
Holesaw Unibits Plastic drill

Tap Drill bit set
Tap Drill Table :


Bending Acrylic:


There are expensive systems for bending acrylic, but for low volume work a heat tape should work just fine. U.S. Plastic* carries heat tapes for bending acrylic in 24" and 48" lengths that will work on acrylic .
of 1/4" thick or less. To bend right angles in a piece of acrylic make a fixture to form it over. When the acrylic gets hot enough to bend, it is very soft and may bend to an undesirable angle without a form. Some people have luck using a heat gun, but it is very easy to burn the acrylic.
Heat tape Heatgun

Finishing Acrylic Edges :
How well the edge of a piece of acrylic needs to be finished depends on its intended use. If it is going to be glued, the type of glue being used and if a clear joint is desired will all affect how the edge will need to be finished. Flat edges without voids will work best for solvent cementing. Using the right saw blade to cut the acrylic will reduce the amount of edge finishing that will need to be done. Remember to not let the edge overheat in the finishing process. A router or jointer can be used to make a rough edge become flat and smooth. U.S. Plastic* carries an edge scraper, plastic plane and carbide router bits for acrylic. A variable speed router is helpful because the cutter speed can be adjusted so it shaves off thin pieces of acrylic without melting them. Experimenting with the router and some scrap acrylic will help find the appropriate bit and feed speed.
Edge scraper Plastic plane Router bit
Gluing Acrylic to Acrylic :
There are many options when it comes to gluing acrylic. Acrylic cements come in various degrees of thickness. Water thin cements make very nice joints because they work into the joint by capillary action, but won't fill any voids. The thicker cements will fill voids, but do not flow into a joint as well as the thin cements. To make thicker cements put acrylic shavings into some thin cement until it reaches the desired thickness. This mixture should be sealed and allowed to sit for 24 hours before using. Pre-thickened cements are also available ready-made. Always remember to work in a well-ventilated area to avoid inhalation of vapors and wear gloves to avoid skin contact. Do not smoke or work around flames as some of the cements are very flammable. Always read the MSDS (Material Safety Data Sheet) for the exact cement being used before using it. Follow the exact cementing procedures of the manufacturer for the particular type of acrylic being used, because different types of acrylic have slightly different cementing procedures.
Gluing Acrylic to Glass :
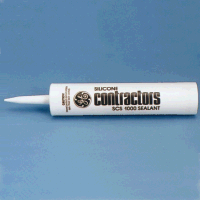
Oceanic uses GE Contractors Silicone SCS 1200 to glue the acrylic corner boxes into glass tanks. U.S. Plastic* sells SCS 1200 in translucent and assorted colors in caulking gun sized tubes. The key to a good bond is for both surfaces to be completely clean, as even one fingerprint will cause the Silicone not to adhere well to it, creating a poor bond. Always allow 48 hours for it to dry and another 7 days to cure completely.
Silicone sealant
Making Acrylic Flanges :
An acrylic flange is common to many DIY and production designs, so it is handy to be able to make them properly. There are two types of flanges: a tube flange has the same ID as the tube it is attached to, while a cap flange has the same OD as the tube flange. The cap flange is used to make a removable cap on a tube. Two of the tube flanges can be used to attach two tubes together. One of the easiest ways to make a flange is with a router and circle-cutting attachment. Rockler* carries several different circle-cutting attachments for routers. U.S. Plastic* and Onsrud* carry straight carbide router bits for acrylic. If a hole is needed in the center of the flange for a fitting, or if this is a tube flange, first drill the pilot hole for the circle-cutting attachment, and cut the OD of the flange. The piece of acrylic should be fastened down so it does not move around while the flange is being cut. For a tube flange, set the circle-cutting attachment to the flange ID, and cut it. To make a flange cap without a hole in the center, use the circle-cutting attachment to cut a circle out of plywood with the OD of the flange. Use the foam type of double-sided tape to attach a piece of acrylic to the plywood disk. Two short strips of tape should suffice to hold the piece of acrylic to the wood pattern. Use a pattern-cutting bit and a router to make a copy of the wooden disk on the acrylic. Pattern-cutting bits are straight-sided, and come with a bearing on the top or bottom. Drilling the bolt holes to attach the two halves of the flange together should be done with care, so that the flanges will easily line up in any position. To do this, make a paper pattern of the flange, and draw another circle halfway between the OD and ID. This will be the bolt circle. Decide on the number of bolts that will be needed in the flange. Divide the bolt circle into that number of equal length sections. Make a copy of this drawing for each flange half. Cut the patterns out, tape them to the flanges and drill the holes. If one side of the flange is going to be tapped, be sure to drill the side that the bolt will pass through with the clearance hole size bit and the side that will be tapped with the tap drill size bit from the table above. U.S. Plastic* and Aquatic Eco-Systems* sell nylon bolts, nuts, washers and wing nuts. Holes that are going to be bolted should have the edges of both sides of the hole relieved with a zero flute countersink. JL Industrial* has zero flute countersinks for $6.


Acrylic is very easy to work with and can be used to make many useful things for your system. It is one of the most flexible and reef safe materials available to work with. Knowing how to work with it is critical. It is my hope that these tips, coupled with some practice, will help you succeed in whatever acrylic project you undertake for your marine aquarium.
Tube flange Flange cap Circle cutting attachment
Nylon bolts Foam tape Pattern cutting bits
Supplier Links and Additional Information Sites:
U.S. Plastic
Rockler
JL Industrial
Aquatic Eco-Systems
Enco
Grizzly
Onsrud
McFeely's
Cryo Industries
IPS Corp (Weld-On)
Ridout Plastics
Piedmont Plastic
San Diego Plastics
One of the best parts of owning a reef aquarium is designing, inventing and building new creations. Custom sumps, overflows, hatcheries, HOB refugia and many other things can be designed to fit your specific needs and space. Not only will you enjoy the act of making something yourself, the money you save can be used to buy that new SE Tyree Tort (one of those fancy supposedly rare expensive type corals)!


Acrylic is relatively cheap in its raw form. In our area, we have a shop that will cut the pieces to exact dimensions. You can cut the pieces yourself with a table saw, but I’ve found it easier (and the same price) to have the shop cut them for me. During your designing, be sure to account for the width of the product in the measurements. I use 1/4-inch acrylic for most of my designs, but there is also a 3/8-inch thickness for large projects.
Planning ahead to have all the supplies available will save time during construction. You will need the cut pieces, the solvent cement, a tape measure. You might need sewing pins, masking tape, wood braces, a marker, a drill.
A dry run can solve problems before they are beyond repair, because once the pieces are welded together, they will not come apart without breaking. I use masking tape to quickly make sure the pieces will fix exactly and to mark where holes may need to be drilled. An exact fit is mandatory for a watertight final product.
Drilling small holes can be done with regular wood drill bits. Shown here is a larger diameter hole bit. The heat of the bit will cause the acrylic to melt, so you do need to work quickly. Drill through quickly and remove any excess shaving stat. If your project is going to be a display tank, you can use an emery board to remove the rough edges. Do all sanding before you remove the protective paper. For display projects, the paper can be left on through the entire build process except where pieces need to attach. This will prevent any scratches during construction. If it doesn’t matter, the paper is much easier to get off before cementing starts.
I have used this brand of acrylic cement with good results. It has a water like consistency, and flows into the seams easily. The applicator has a long blunt needle, and the solvent does not clog it. This solvent really is like a weld to the seam and not at all like glue. It almost seems to melt the pieces together.
This brand might not be available in your area, so you might ask the acrylic supply staff which brand they recommend.
For projects where looks aren’t as important, I usually tape the pieces together before cementing. I like to be able to move pieces and feel confident I have the holes, dividers and drains in the right place. Make sure the fit is tight and the pieces are securely held so you can manipulate the project easily. I like to be able to turn the project so the solvent can flow into the seams using gravity, using a wood block to lift one side or the other.
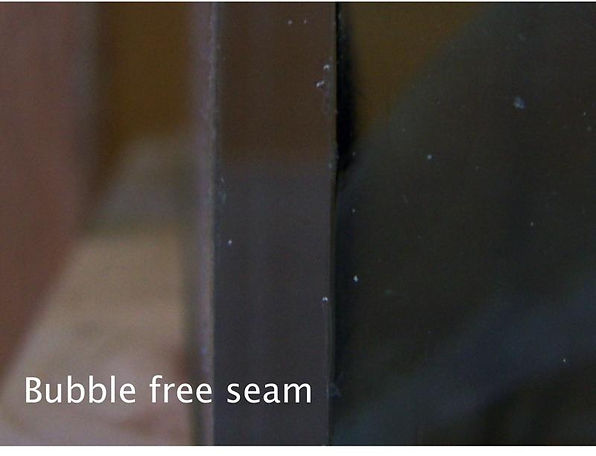
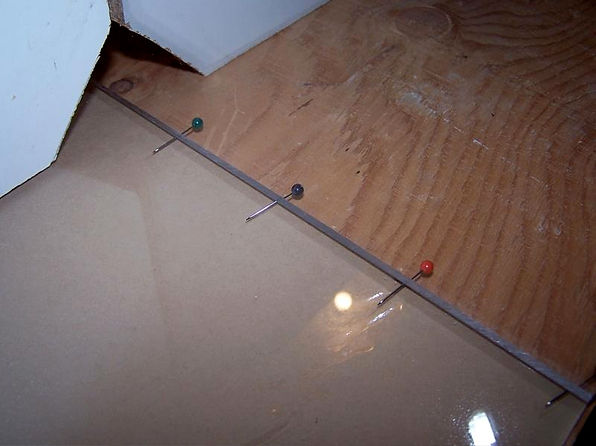
When aesthetics do matter, the pin method can be used. Place stickpins in the seam before the solvent is applied. Apply the solvent, wait 60 seconds or so, then pull out the pins. This can make a completely bubble free seam. This method does require quite a bit more time, as each seam will need to dry completely before the project can be manipulated.
The gluing process itself is simple. Position the project using wood blocks under your work table to tilt the project so the seam you are working on is lowest. I like to place the project at such an angle so that light shines on the seam. The cut edges are white and as the solvent enters the seam, it becomes clear. Turn the applicator upside down over the seam, no need to squeeze the bottle. Knowing that the solvent will drip like water allows you to place the needle appropriately. Allow just enough solvent to drip into the seam to make the edge clear.


Wood braces can be used to hold pieces during drying time. Make sure the braces are exactly 90` angles to enable the final project to line up with all the corners. Cut a inch or so off the corner to allow for the solvent.
The project does need to cure before you can test it out. The product guidelines for this solvent, Weld-on #4, state cure time is 24-48 hours. I try to make myself wait at least overnight for anything I’ve constructed, but I must admit I don’t always for small projects. I do make sure all projects that need to be leak proof hold water overnight before putting it into use. Place them in a bathtub with newspaper underneath to watch for tiny leaks or the patio on cement.
I usually try to place a weight of some kind to apply a small amount of equal pressure to the seams that are most important to water tightness during the cure.
Large projects that must contain a significant amount of water might need to be braced to prevent bowing of the acrylic when it is full. Bracing can be inside, using baffles glued in, on top with a brace spanning the middle or on the outside. You can get 2 inch 3/8 acrylic that works great, or just use wood like I did for this sump. Of course, the acrylic will look nicer longer with our wet hobby.
Tips :
-
Try to keep the area clean during construction. Anything that possibly can find it’s way into your seam will.
-
If you find any leaks after curing, you can use Weldon 16 to cement a 1/4 x 1/4 inch acrylic strip to that area. The plastic supply will have small pieces of acrylic in their scrap pile.
-
Plastic needlepoint mesh from the craft store can be glued to acrylic with aquarium safe silicone. This can be used for overflows, drain covers or any place where you want water to flow, but not other materials (including fish). It comes in different gauge sizes, so using the largest size holes possible will allow for the least cleaning when the project is in use. It does clean easily with a soft toothbrush.
-
Plastic cable ties from the hardware store make great bulletproof anchors and tie downs for tubes, drains or equipment.
-
The hardware store also has a large supply of plastic and nylon screws, which can be invaluable to your design. Plastic plumbing supplies used for kitchen appliances, can be used for the standard bulkheads sometimes used in commercially made aquarium gadgets.


With a little ingenuity, most hobbyists can design and build the custom equipment they need to solve their personal needs and desires. Issues with limited or dysfunctional spaces are just reasons to design a custom sump, overflow box or even a designer aquarium! Enjoy the flow!
Another Adhesive : Evonik Acrifix Also a good adhesive for Acrylic which is Widely used and also the Above Weld On 4 .
For More Information about Acrifix from Evonik : www.acrifix.com
How to make an Acrylic Fish Tank DIY Aquarium Guide
Product Acrifix 192

HOW TO: glue acrylic (welding)
Drilling holes in various materials is something you probably haven’t given a whole lot of thought to during your do-it-yourself career. But it’s something that can bring your project to a screeching halt if you don’t have the right tools or knowhow. In this video we’ll explore how to drill different types of holes in different materials.
-How To Drill a Hole in Wood vivariums :
1- Spade bits are measured by the size of the hole they make.
2- Speed bore bits are similar to spade bits but have an auger to help remove waste.
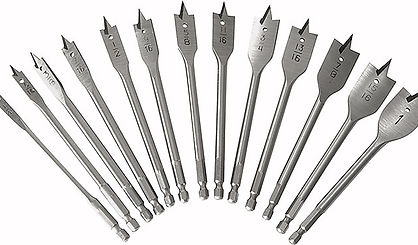


3-For drilling more precise holes with flat bottoms, you probably want to use this Forstner bit, which is great for countersunk cabinet hinges or concealing the hole with a plug.


4-Another option for drilling larger holes in wood is this hole saw, which is commonly used for drilling through doors where the lockset will be installed. Or an access hole for a birdhouse.
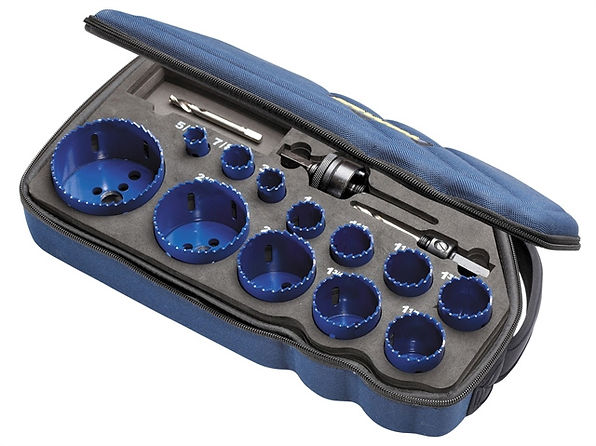

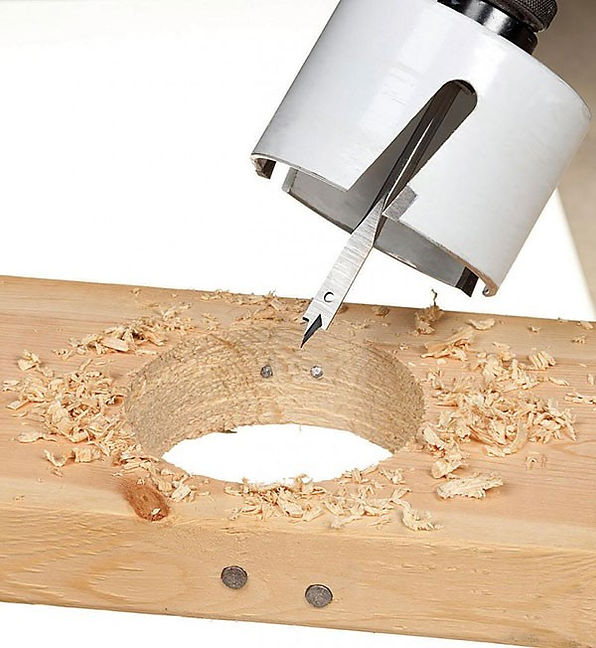
How to use a hole saw
Woodworking Tips : How Do Forstner Bits Work?
Wood Boring Bits
Power Tools & Carpentry Skills : How to Use a Spade Bit
How to make a wooden vivarium!!(step by step) :
When we making circular holes in the vivarium we do a 50% of the work ..
But still we need to learn how to join the pipes and selecting a proper pipes for the job we need ..
1- A rule of thumb that every 1 meter square need half inch pipe to drain more area need wider pipe and here we need to know that the area is NOT the floor area of the vivarium but we also add the surface areas of the drift wood , rocks .. etc .
- So for the 1 meter square surface area of the vivarium you need ( for the tropical vivarium ) at least 3/4 inch of one pipe drain .
- Also put another pipe as a spare pipe in case of the first one blocked.
2- Strainer is Very important to avoid the soil to be souk in and block the pipe ..
3- In larger commercial vivariums .. It is high recommended to put a clean out to clean the main pipe if you connect more than one vivarium with one drain pipe


Strainers and bulk head types and combinations with insert type 90 pipe fitting .
Complete combination of drain
Strainer is important to avoid any debris to come in - the pipe and cause a blockage .
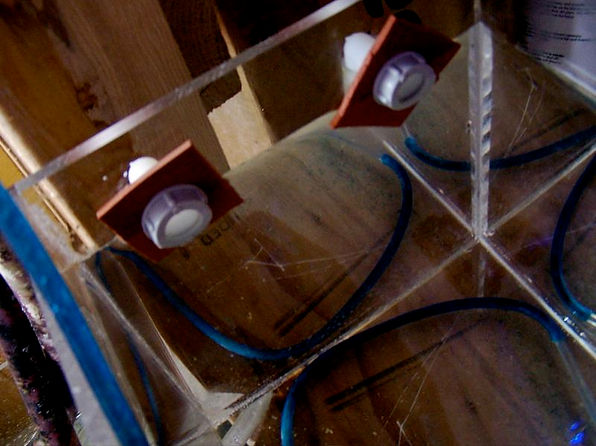
Below is completed work connected to the tank .
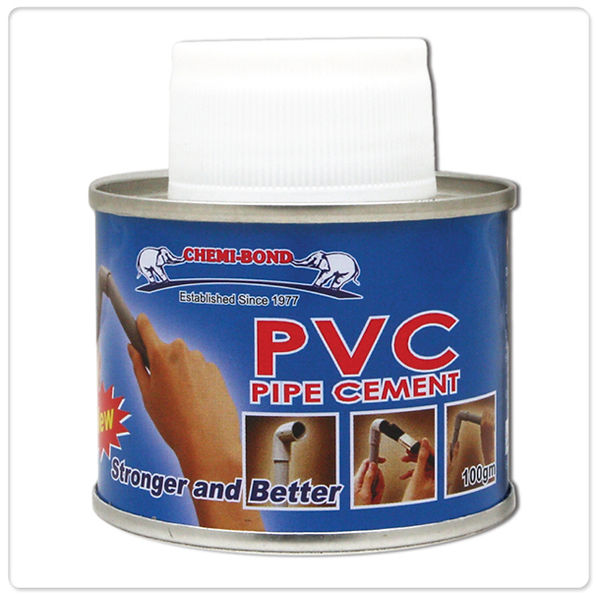
Using UPVC Cement : for drainage pipes we use the adhesive called UPVC cement it is need to clean the surfaces very well before applying the adhesive and to work quickly because it is dry with just few seconds .. alot of types and brands available in the markets for this materials ..
UPVC Fittings : Alot of types for every turn or drop in the pipes and alot of colors also availbe to met your need and also you can paint the pipes as per your need ..
the threaded fittings used mostly with pressure pipes ( presure of watyer from pump or air from compressor ) .
Video : how to use the UPVC cement
What is the difference between uPVC and PVC pipes?
The term PVC stands for polyvinyl chloride, and the term uPVC stands for unplasticized polyvinyl chloride. PVC pipe is often used to distribute water that people aren’t going to drink. It’s also used to insulate electric cables. The uPVC versions often replace wood when building window frames and sills. The uPVC pipe variant also often replaces pipes made of cast iron for drains, waste piping, downspouts and gutters.
Many people use PVC instead of metal, as PVC is much easier to cut than metal, and it’s also easy to use glue together. In addition, PVC is still fairly tough, so not much strength is lost. Most plastic piping around the globe is actually uPVC because of how resistant it is to degradation caused by chemicals, high and low temperatures and various pressure points. The uPVC version of piping is less flexible than regular PVC, but it's also more recyclable.
Neither uPVC nor PVC pipes are used for drinking water. The cPVC variant is used for this purpose instead because it is much safer.
Some of the drainage works in vivariums ..

Select from more than 15 DIY projects..