DIY 4 : Custom In-Wall Vivarium :
We recommend to visit this Website for more information :
www.neherpetoculture.com/vivariumconstruction101
www.neherpetoculture.com/vivariumconstruction102
Please click here for custom background :
I've started planning this project in more detail and wanted to share with the community the build from start to finish. I will need help along the way so this would be good place to keep all conversations regarding this custom viv grouped together. This is going to be a long build. Probably close to a year when its all said and done from first cut into drywall, to tankconstruction, to hardscaping, to planting, to grow in and finally the introduction of frogs.
1- PLANNING STAGE :
THE LOCATION:
Here is the recessed wall I am going to be working with along with dimensions and even stud locations. The main goal of this build is to have the final product look like it was built into the house as part of the decor. When completed, all the internal workings of the tank will be hidden from the viewer with just the front glass allowing the viewer a look into this living piece of art, if you will. The tank’s perimeter will be finished with decorative moulding to match the rest of the house.
www.dendroboard.com/forum/parts-construction/274857-build-journal-custom-wall-vivarium.
I recently posted a thread asking the community's opinion on 2 different custom vivarium ideas I had. There was an in-wall idea and a 360 cube. The winner from that was the in-wall. Here's a quick mock-up of the idea I had for the in-wall:


THE TANK :
The tank will be tall, at almost 45”, and a little less than 24” wide, but not very deep at 12”. It will be made out of 0.25” thick Starphire glass and will feature a sliding front door for feeding and maintenance. The bottom of the space will house the power, pump and brains (ECO500) of the operation. The top will have reserved space for lighting and the misting nozzles and access to refill the water reservoir.
THE RESERVOIR AND CONDUIT
Behind the tank and the drywall will live two PVC tubes. The left will be constructed out of 4” PVC along with some 90 degree elbows to become the tanks water reservoir. The tube on the right will be made out of 2” PVC tubing with two 90 degree elbows and will allow me to run wires and plumbing to the top of the tank. A support shelving, at the bottom will elevate the tank and allow room for the pump and controller.
THE MISTING SYSTEM :
MistKing. What else? I will be sending the water from the reservoir up to the top using the MistKing Starter Diaphragm Misting Pump (http://www.mistking.com/Starter-Diaphragm-Misting-Pump.html). Since I will be only running two nozzles, this will be more than enough. Because the tank is not that deep or wide, I opted to use MistKing’s Premium Straight Misting Nozzle (http://www.mistking.com/Starter-Diaphragm-Misting-Pump.html). I spoke to Marty at MistKing and he informed me that the nozzles provide a 24” diameter spread @ 24”.
THE VENTILATION SYSTEM
Because there will be no ventilation holes drill into the actual tank, I devised a plan to run a series of CPU fans to control the temperature and humidity inside the viv. this will be controlled by the ECO500. A custom built piping system will deliver cool air to the bottom-front of the viv (hopefully removing any condensation from the front glass), up through the tank, until it is finally exhausted out by the top-rear exit pipes. Also smaller CPU fans will be installed at the top and bottom of the wall to keep things cool for the lights and electronics. These fans will be constantly running.
THE LIGHTING SYSTEM :
This is where I find my biggest challenge. How do I provide enough light to the bottom of this tank without burning the top plants and overheating at the same time? My idea (which will probably change after doing more research), is to use six Jungle Dawn 40W LED Spotlights. Two at the top and four along the sides to fill in the lower areas of the tank. Again, this is just a first thought and my gut is telling me it’s overkill. Hopefully we, as community, can find an effective solution. All I know is that I want to use LEDs, they need to be dimple and compatible by the ECO500. Let the ideas fly. Along with the main grow lights, I plan on adding color to the tank in the way of waterproof, outdoor LED lighting. This is so I can add color to the rampup/down times of the day, moonlight at night and perhaps even a thunderstorm effect timed to the misting schedule.
CONTROLLING THE ENVIRONMENT
As mentioned earlier, I will be using the ECO500 (http://www.mistking.com/Starter-Diaphragm-Misting-Pump.html), from EcoZone to control all aspects of the viv. I chose the ECO500 because of the four controllable 120v outlets, the I/O interface for the MistKing system (this is nice because it frees up an outlet for other uses), and the ability to ramp up/down the main lights in a 24hr cycle. The below plan shows the final location of the unit as well as other details such as hydroballs for drainage, false-bottom, substrate thickness and background thickness.
Well that’s the plan so far. It’ll probably change as I do more research and talk more with other members of this community. Thanks, in advance, for any help. And I hope you enjoy the journey of this idea going from simple 2D plans to reality.
2- Project construction :
Back wall opened for receptacle, water reservoir and conduit install.
Conduit (black pipe) assembled and main body of reservoir (white pipe) assembled and fittings cemented.


Pipes and receptacle dry fitted into space.
Power = check.
Construction update.
I did a 24hr leak test on the water reservoir after all fittings were cemented together. It passed. I added some insurance to the joints by applying a bead of silicone. I won't be able to get to the reservoir once installed, so the silicone gives me a little more piece of mind.
Here are the reservoir and conduit installed.
Here is the wall back up with the first coat of mud. I'm not the best mud and taper so I rely on thicker coats and then a lot of sanding. Lol.
I placed the order to the MistKing system. Should be here early next week. I'm getting quotes on glass cutting. Yes, after further thought and the opinions of fellow members, glass was the best choice for ease of waterproofing and longevity.
Construction update.
Drywall sanded, primed and painted. Bottom shelf, to separate plumbing and electronic devices, installed.
MistKing system came in this week. I installed the bulkhead on the PVC end cap. Siliconed it (sloppy :P) for insurance. And installed the pump.
This one is a manually controlled CPU fan controller with variable speed. It will be responsible for keeping the electronics under the tank cool. It too will also control 2 fans. I will keep this running at all times.
Construction update.
Water drain, air intake and exhaust assemblies ummm... assembled.


Construction update.
Waiting for parts to come in. Kind of at a stand still until the glass is cut. So I decided to work on other parts that don't rely on having the glass assembled.
Net cups for background planting with drainage tube.
Fake vines of various sizes. Hanging to dry.
Electrical question. I stripped the wires on the plug that I will be connecting to my 12V DC power supply. Not familiar with the color code. What color is ground, live and neutral.
Here's a pic:
I bought some RGB 5050 LED strip lighting and a TC420 to control them. The idea is to simulate the dawn/dusk and moonlight ramp up/down for this viv. It's not the main lighting for growing plants just for the effects mentioned above.
I need to cut strips to fit the shape of my tank and to go around the main grow lights. How should I wire these strips together, series or parallel? My power supply is rated at +12V 16.7A.
With a tank size of 24w X 46h X 12d how much of the LEDs would I need to make the colors fill that space up nicely. It's my first time attempting this so I have no clue. I going after nice rich colors.
Main grow lights came in.
Construction update.
Main grow lights installed. I have no par meter but I think I got some good light for growing some healthy plants.
Firefly LED lights came in.
I was playing around with some hardscape ideas. I picked up some driftwood and placed them in some configurations. I want my main focal point to be a tree structure made up of multiple pieces of wood. I made sure to grab pieces of driftwood with a lot of deep holes and crevices so I have the opportunity to plant lots of smaller plants in them. In the end when it is all grown in, I want it to look like the base of a really old tree.
I would love some opinions and/or suggestions. I have a favorite among these four but would like to see others think is esthetically pleasing.
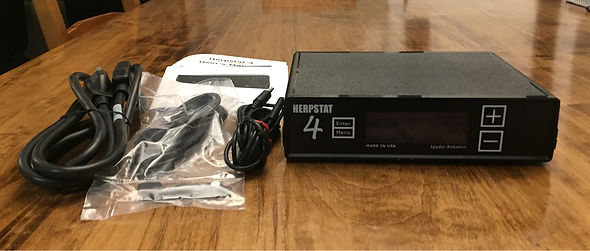
More parts came in.
The Herpstat 4 V2 from Spyder Robotics. This is going to control the misting, cooling (if needed), humidity and some lighting effects while providing me with temperature and humidity readings.
Originally I was going to grab the ECO500, but they stop manufacturing them.
Other parts came in.
Cabinet cooling items.
This one is going to power and control the cooling at the top of the tank where the lights are located. It has a thermostat and will turn on the fans at a user determined temperature and shut them off. It will be controlling 2 CPU fans. Intake and exhaust.


Started working on a lighting schedule. Let me know what you think.
The Kessils are going to provide 100% growing power for 8hrs a day. They will ramp up from 5% to 100% in 2hrs and then hold steady for 8 and finally back down to 0% in 2hrs.
At the same time I'm going to have RGB LED strips adding some color to the day/night transitions controlled by a TC420. During sunrise and sunset they will be adding an orange hue while the grow lights ramp up/down. During daylight I will be keeping the red and blue LEDs on at 100% for plant absorption (I read that plants make use of the Reds and blues in the color spectrum, I guess that's why weed grow lights are often purple). I'm hoping the Kessils are powerful enough to drown out the purple hue. We'LL see. At night the tank will take on a dark blue color by utilizing only the blue LEDs at a lower power to simulate moonlight.
Between 8pm and 2am, when the grow lights are off, the fireflies will come out. This way I can enjoy the effect while I'm home.
All this is just a starting point. Of course, I will adjust intensities as I see how the plants are doing.
Here's a graph depicting the above description.
Construction update.
Molded the mushroom ledges using zoopoxy 307. First time using the stuff. Pretty easy to apply. Not as smooth as I was after, but I will be filing and sanding to achieve the final shape. Then on to painting.
I also had quite a bit of zoopoxy left over so I made some stones. Maybe I'll be able to use em in the viv.

More waiting on glass. Supposed to be ready for Monday (fingers crossed).
In the meantime I started some DIY hardscaping. I making some mushroom ledges for the base of the tree.
What you are seeing in the following pictures is the rough shape and size made out of high density, pink, insulation foam. I glued them on the drift wood in my desired locations.


Construction update.
Finished painting the mushroom ledges. Gonna let it dry for 24 hrs before applying a clear protector on it. I got a matte finish for the clear coat so it wouldn't look too shiny.
Glass is in!
Predrilled for bulkheads, misting nozzles and ventilation. Let's build a tank.