Tropical Greenhouse
Build Your Own Tropical Rain Forest. Anywhere!
courtesy to: www.exoticrainforest.com/Build%20your%20own%20tropical%20rainforest.


For easy access we had a 4 foot wide walkway built around the room in the shape of a "U". That was done partly because I get around in a wheelchair and the wooden walkway makes it much easier for me to get most places in the building. But it also adds to the beauty of the building. In some cases you may find a simple stepping stone path will work as well. But in my case, when I build the next one I plan to make the walk even wider at least in some places. Plants tend to grow in over the walk and make it appear narrower that it is. And in a wheelchair, even four feet is difficult to turn around or negotiate tight corners. Just another reason to have made the building even larger. Be sure and use pressure treated wood. The humidity in a tropical atrium will destroy unprotected wood in short !
Constructing a Tropical Atrium
Before you read how we built the Exotic Rainforest, take the tour and see what is inside!
In 1999 I told my friend Tom White who is a botanist for the State of Florida I was going to build a rain forest under glass once we moved to Arkansas. He and his wife Linda own Zone Ten Nursery in Homestead, FL. Tom just laughed!
I enjoy being told "that can't be done" and always consider it a challenge. If you ask Janice, my wife of over forty years, you'll learn I'm more than a little bull headed. She has put up with my wild whims for a very long time but even this outlandish idea was one she thought I might never achieve.
In 1976 I had announced I wanted to be an underwater photographer for Skin Diver Magazine. At the time I barely knew how to scuba dive and had recently purchased my first 35mm camera. Three years later I published my first article in the pages of Skin Diver and over the next 8 years published another 200 articles on their pages. Three years after I told Tom I was going to build my own rain forest our Exotic Rainforest began to flourish.
In the summer of 2006 I received an email asking for complete instructions on the process we used to construct our rain forest atrium and over the next few months I was asked question almost every week. This article is the answer I forwarded after those folks first asked but it has been updated many times. It really isn't difficult but it does require a lot of planning.


If you're going to build a rain forest atrium and you're not in Florida, Southern California or a similar temperate climate the first consideration is how are you going to keep the plants warm year round? Tropical plants aren't known as being "tropical" without a good reason! They love warm, humid conditions and the slightest freeze will turn most to pure mush. Some can't tolerate temperatures that are even moderately cold so anyone wanting to build a "rain forest" must learn how these beautiful specimens live and grow in nature. Unless you duplicate their natural conditions your chances of success are nill. If you read many of the pages on this site you'll find I frequently tell you where the plant grows in nature, at what elevation it grows, if it lives up in a tree or in the soil, and many other tidbits that many people consider useless. That information is hardly "useless". If you read carefully you can figure out what makes a plant flourish and my goal was to make all of them not only live but grow just like they do in nature.
The first major factor became how do we build a building that will duplicate the tropics but do it in northwest Arkansas? Arkansas is in the center of the U.S. where the weather isn't terribly cold but we were moving to an area of the Ozark Mountains that had one of the highest elevations in this part of the country. The winter temperatures can easily drop well below freezing for weeks at a time so the building had to keep the plants warm and humid but also give them all the light they needed to develop, grow and reproduce. The major problem was to build such a building cost money and our budget was shall we say "limited".
There are many companies who build "sun rooms", and that type of structure may work for you. In our case, the cost of having one built would have exceeded $70,000 US dollars and we wanted to build our Exotic Rainforest for about 40% that cost using professional labor for the structure but those costs were in 2002 dollars and all the improvements to the building are not included. We managed to build it within budget by using a great deal of volunteer labor. The value of our adult plants would now easily equal the original cost of the structure.
I searched for a long time for what I considered to be the best thermal protective material. At the end of that search I now strongly suggest you consider using a really good thermal material since it does get cold in most parts of the United States. Far too cold for most tropical plant species. Glass just won't do the job efficiently. It is heavy, easily broken, and looses heat quickly. Many tropical plants do not appreciate temperatures below 55 degrees (some not that low) so you will need to provide them lots of thermal protection to keep them happy, flowering and growing. So the first thing I had to find was a material that would do the job, would not break the bank, and would last a very long time while withstanding hail storms. We have hail storms in the spring!
After a great deal of research I found and chose GE Lexan Thermoclear™. There are a lot of materials out there including Lexan corrugated material. but I'm convinced the multi-walled Thermoclear™ is the best value. Experience has proven it works great. Mine is double walled and is around 1/4 inch thick. It works quite well but I now wish I had used the triple wall version. I spend enough each month in the middle of winter to heat a 600 square foot atrium to a minimum of 55 degrees to have paid for the difference in wall thickness in five years. During the day, so long as the sun is shining, the GE Lexan Thermoclear™ will create enough heat energy from sunlight to keep the atrium comfortable. But when the sun falls we have to rely on some type of artificial heat to do the job.
General Electric's Lexan Thermoclear™ will help hold the heat in during the night but one of its best properties is its ability to create heat from light during the day. With the rising price of natural gas and other fuels, especially electricity, the thicker material can save a bundle on overall heating costs. When it gets in the 20's, and lower, the thicker material will save even more every month! The double wall may work just fine for you depending on where you live (we're in zone 7) but at least consider spending the extra on the thicker, more protective, and more efficient material. You may find it will pay for itself in just a few years. You can find Lexan Thermoclear™ and information about its uses on the General Electric website and they will give you names and phone numbers of dealers who sell it. Their address and phone number is at the conclusion of this article.
Lexan Thermoclear™ comes in either 4 x 8 foot or 4 x 12 foot sheets and is easily installed. We built our atrium of pressure treated cedar 2 x 6's atop a concrete foundation set 18 inches (46cm) into the ground. For maximum support there is one large 6 x 8 inch pressure treated cedar timber in the center of the room with another 6 x8 cedar cross beam running form the east to west wall to tie the entire building together. The the center support beam is sunk in two feet or concrete.
If you want a more beautiful structure there are companies including General Electric that make metal frames that allow the Lexan Thermoclear™ to be simply inserted into slots within those structures. With Lexan Thermoclear™ you can even make the walls curve slightly. Before you begin be sure and check with your city or county for local construction regulations since they vary all of the United States!
In our case, the Lexan Thermoclear™ is simply screwed to the wood and sealed with clear Silicone sealant. Once the Lexan is attached thin strips of cedar were applied to the seams to seal them further and make the exterior of the building look more professional. The tiny gaps between sheets MUST be sealed with silicone sealant, do not avoid this extra step! If you leave the seams unsealed the Thermoclear™ will loose efficiency and mold will form between the doubled layers of the exterior walls. Our building is framed much the way you would frame a standard wood home with the exception we did not want any interior walls to block the sun's light.
My building is 16 feet 4 inches (5 meters) tall at the highest point with a 12 foot (3.66 meter) outer wall height. Since many plants have already tried to outgrow that height I've decided if I ever build another one, and I just may, it will have a taller center post as well as both longer and higher outer walls.
One very important consideration needs to be addressed at the time of construction or you'll be paying thousands of dollars in repair costs just a few years later. No wood product will last forever but you can extend the life! You are considering building a structure that will contain a highly tropical environment and tropical environments make wood rot! The interior moisture and humidity will remain high year round so be certain all the wood is coated with a water protection material such as Thompson's® WaterSeal® Advanced Clear Multi-Surface Waterproofer. This product offers a far superior protection to the normal Thompson's® Water Seal®. Every stud, every base plate and every cross beam must be protected or in under 10 years
the building is going to rot! The wood should also be recoated on a regular basis if you plan to to make it last.
We learned this lesson the hard way since our original builder assured us the cedar would last a "life time". He was wrong! After only 6 years we began to find a few cedar studs totally rotting through near their bases. We were forced to have another contractor go back into the building, dig up many plants and then double plate each side of those studs with new 8 foot tall cedar 4 x 6 boards. At that time we had every piece of wood pressure cleaned and then sealed at a cost of multiple thousands of dollars!
If you want to make your "rain forest" lasts do it right the first time. Seal it! Don't trust any label that says the wood has a "lifetime guarantee". If you read the fine print most will say something to the effect "warranty void if the wood is exposed to water"! The wood is going to be "exposed to water" in a tropical atrium!
A mistake I discovered we made after the building was finished was the size! My wife didn't like the idea of my using the entire backyard when I indicated I wanted to build a rain forest atrium 36' by 36'. After a lot of "discussion" I scaled the size down to 24' by 24'. Guess what? That is now much too small for what I need! I have many more plants (and more I want) than I now have room so I should have built it 36' x 36' in the beginning! Believe me, I'm going to build one that size when we move next! We are now beginning to consider a move to the Sherwood, Arkansas area to be near our children and grandchildren. If you'd like to a nice old Victorian house with a rain forest, send me a note!
My point? Plan ahead. You'll hate yourself if you let your love of plants outgrow what you build and tropical plants will grow much faster than you have ever experienced if you give them a "rain forest" structure!
The conservatory of the Peirce-Dupont House is unusual in that it is in the center of the house rather than at its extremity.
Be sure to also prepare for plenty of ventilation, especially during the summer, using lots of covered fans. Tropical species do not appreciate sitting in dormant air any time of the year. They need adequate circulation all the time! Dormant air, combined with high humidity, is a guarantee of plant disease and unwanted pests! So insure the air is moving at all times. I now recommend covered fans since some of the taller plants will eventually grow into them! We have two ceiling fans that run in reverse all the time to draw air from the outside ventilation openings (which can be closed in winter) into the building. But the tall Alocasia sp.,Bird of Paradise, climbing Philodendron sp. and banana trees eventually find their way into the blades. Plan ahead. At the rear of the building we have two exhaust fans on temperature controlled timers that begin to run when the temp near the ceiling hits 80 degrees. These help to evacuate the excess heat during the summer months. Those exhaust fans have automatic closures which prevent heat from escaping in the winter as well as cool Spring and Fall evenings. They also have manual on/off switches to prevent heat from being evacuated in the winter. That type exhaust fan is commonly available at home renovation stores. Standard greenhouse construction works very well for a tropical atrium provided you insure a very high humidity. You can find a lot of books about how to do it at home improvement stores or good book stores. For winter heat, we use natural gas. Other growers have reported problems with some gas fuels such as butane. Apparently some fuels can create fumes within the atrium that conflict with the plants ability to grow. We have observed no problems with natural gas.
The big secret to making your tropical plants grow as they do in the jungle is the soil mixture, designing the room to hold in humidity, and the amount of water you plan to give them. We spent a lot of time preparing the soil before the first plant went in the ground. We mixed a huge amount of peat, good potting soil, sand, humus, cypress mulch and a few other goodies such as large quantities of Perlite™ and pellet fertilizer in our own Arkansas clay before ever planting anything. My goal was to make the soil porous, quick draining and tropically rich while retaining moisture. The peat, cypress mulch and humus all helped to increase the ability of soil to stay damp but not soggy. It also tends to keep the soil pH low, something tropical plants prefer.
As a general rule, tropical plants do not like their roots overly wet but they love moisture. If you ever visit a rain forest you'll discover the soil there is often very easy to dig. That's because there is so much decaying material mixed in with the growing media. By adding lots of peat and humus, along with the other ingredients, you'll speed up that decaying vegetative process. We add new cypress mulch regularly as it decays on the surface. We don't carry off all the dead leaves that collect, we just try to turn them into the soil whenever possible and let them do their job naturally. Those dead leaves contain natural fertilizer! As you can see from the photos on this website it appears to be working.
The next thing to consider is the study the plants you want to plant before you start digging. Before you plant anything make a plan. A computer program called 3-D Landscaping will help. With it you can layout where you want the planting areas, the walks, the pond, furniture and other fixtures. Figure out what needs more light and which need less. Rain forests have both canopies and wide open areas. Plan for the plants that require both. We have a descent sized group of bananas and heliconia plants that love the sun. So one area is left fairly open so the summer sun can beat down. But below them we have a lot of Anthurium sp., and other plants that like bright filtered light. That way we can utilize the full atrium for all kinds of species. In other areas where we have planted small flowering trees we planted species beneath their branches (and on their branches) that love filtered light. We even have areas for plants that don't particularly like the sun and thrive in very low light. Plan ahead and you'll keep everyone happy for a much longer life.
If the plants you wish to grow require more water in their soil calculate all of that before you start digging holes. The same is true for plants that like to dry a bit. If you have plants that need to dry out between watering allow for that need so you don't quickly drown their roots. In those areas add more peat moss and Perlite™. Plan the entire building's planting areas before you put anything in the ground! If you give the plants what they want before planting you will be shocked at how fast they will grow and reproduce. If you read my plant descriptions on this website (http://www.exoticrainforest.com/plantscollection.html) you'll find I try to tell you what the plants will like and will not like in regards to water, soil and light. You'll find out you don't have to dig up nearly as many plants later and move them somewhere else!
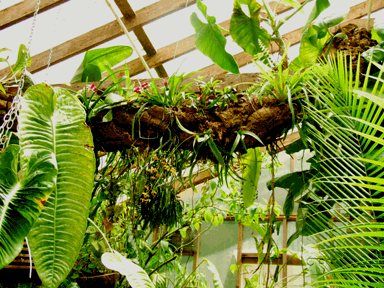
A large number of jungle plants are epiphytes (ep=a-FIT). They grow on the sides or up in the trees. In fact, scientists estimate 70 to 90% of all plants and animals in the rain forest live up in the canopy! There are more plants growing on other plants in the rain forest than growing in the ground! Plan in advance to give them something to which they can attach themselves so they can hang down or grow upwards while attached. You'll find the effect of a real jungle is more quickly achieved when you have hanging vines and roots!
Since we used cedar for the entire building we allow it to be a "growing media" for epiphytes all over the building. Our center post and center columns are 8 inch x 6 inch posts. If you look at the photos in the Views of the Rainforest section you'll see they are now almost covered with plants which have attached themselves to the cedar. In other parts of the building we solved the problem by borrowing an idea from Fairchild Tropical Garden in Miami, FL. In the Fairchild tropical atrium they created a gorgeous display of orchids, bromeliads and other epiphytes by attaching rolled cork bark to 4 inch PVC pipe with screws. The sections of PVC can then be assembled with a variety of PVC joints to create what appears to be fallen logs or broken tree branches and tree trunks laying on the ground or falling against piles of rock. Rolled cork bark is expensive but if you search for it and it by the bale (approximately 130 pounds) you can still find it at a fair price. The cork bark will last a long time and with a little assistance, such as a small amount of Liquid Nails glue, you can "convince" most epiphytic plants to attach themselves.
One grower who is building a similar building in Kentucky recently sent photos of a large rock wall with terraces. I wish I had thought of that idea! Especially one with an enormous waterfall down the center! That technique is known as a "wet wall". A small water pump is used to pump water to the top of the wall which is filled with rock and sphagnum moss. Climbing plants such as Philodendron sp. and Anthurium sp.will grab hold of the damp rocks and climb just as they do in the rain forest! The next ExoticRainforest will have one!
A pond is an absolute must. Rain forest plants need the humidity and a nice pond with a waterfall will keep the humidity high all the time. While recently visiting with a staff member at the Missouri Botanical Garden in St. Louis I was asked how we managed to get our plants to grow so thickly. I answered "the same way you do in your main display"! "Lots of flowing water!" We estimate our pond holds approximately 2500 gallons. The waterfall in the atrium runs at approximately 5000 gallons an hour when the filters are newly cleaned. As a result our atrium rarely drops below 85% humidity and most of the time is higher. In the morning water drips off the ceiling all over the building. In addition, our atrium now has a complete overhead misting system which operates on an auto timer. Our system was installed by friends Richard and Teri Baber and Teri is a member of the International Aroid Society.
There are lots of good books with instructions on how to build a pond and waterfall. Just plan ahead about the filtration. You will need it! The pond is also a great place to grow tropical water lilies. Just make sure you keep the pond from being totally covered over by large plants which will block the sunlight. If you don't have a pond or other source of moving water in a large volume you can be sure the humidity will suffer during the winter since your artificial heat system will dry out the air.
Unless you just love to stand in the "garden" with a garden hose in hand have a good misting/watering system built attached to the rafters. Most tropical plants like lots of water in the Spring and Summer and less in the Fall and Winter. If you have a system put in on a watering timer you'll soon figure out just how much water everyone needs ever day. A water timer will make keeping everyone happy a lot easier, including you, when you need to be away for a
few days! For us, 7 minutes up to 10 minutes a day five days a week seems to work best in the summer heat. In the rain forest rain often falls in the afternoon at the heat of the day. I try to copy that to some degree. It is extremely important you maintain the humidity level at above 80% or higher and watering along with an indoor pond/waterfall will help.
Don't forget the natural sounds of the rainforest to add to your complete rainforest experience. We installed a set of waterproof speakers attached to a CD player capable of rotating 5 CD's. We located a bunch of natural rain forest sounds from a variety of sources and play them almost all day long on a rotating schedule. We even located night recordings of jungles in Costa Rica that include tree frogs and an occasional howling monkey. A great source for many different rain forest recordings is Listening Earth. You can listen to samples on their website at: http://www.listeningearth.com.au/ Don't forget the natural ambience of rain forest animals. We have also located some very nice South American Andes reed flute music with the sounds of rain forest birds in the background. Very restful when you are in your "jungle".
We added quite a few tree frogs and small lizards (anoles) which really add to the joy and experience of being in a rain forest. Snakes? No. Not us. But we did once have a grass snake find its way in somehow. Fortunately it found its way back out before my wife could get to it! If you do decide to add live animals be sure and plan for their nutritional needs! We turn loose 1500 baby crickets once a month for everyone to stay fat. Of course, don't forget to feed the crickets cat food or fish flakes so they will grow and chirp for you at night. Since cat food is full of protein the crickets eat the protein and pass it along to the frogs and lizards. Crickets can be ordered from a number of sources on the internet. The listening experience created by the crickets is also incredible! Visit a good pet store and a book on caring for rain forest frogs and lizards. They are simple to keep healthy in an artificial rain forest. Our's even produce babies each spring!
Birds flying free in your rainforest? I'm not convinced that is a great idea. We've done it. Forest, our Red Rump Australian grass parakeet has made many trips around the Exotic Rainforest with no apparent damage to either himself or the plants. Our pair of Sun Conures have made a few flights but prefer to stay in or on their cage. They know where the food is! The male conure has been out a few extra times and always finds something to chew. But even though we allow our recently added Blue and Gold Macaw, Wizard, to stay on a perch outside the cage during the day she is not allowed to fly free. Macaws are notorious for chewing on anything and everything including rare plants!
If you have rare plants that could be dangerous for your collection. Large species, such as macaws and cockatoos, would certainly chew everything in the room. Since our birds seem to prefer the security of their cages we have now elected to let them "stay home". If you plan to allow birds to free-fly do not use ceiling fans! The birds can easily fly into the blades!
A word to those of you fortunate enough to live in a climate where you don't need a building to house your "rain forest". We once owned a home in South Florida near the coast in far southern Miami. I elected to turn the entire backyard into a rain forest with Biscayne National Park directly across the street! As a result many of the natural and imported "rain forest" animals moved into the yard. We had a selection of anoles and other lizards including iguanas many varieties of tree frogs, Bull Frogs and probably a few snakes although we never saw any. Colorful parrots and macaws from nearby Parrot Jungle even came to visit and sample the fruit from our banana and Papaya trees. We even had an Almond Tree that produced nuts and made a perfect food source for the larger parrot species.
The ponds were filled with blooming water lilies and we had many tropical fish in each. One critter that has been imported into Florida from Cuba also moved in, the Buffo Toad. Buffo Toads are not dangerous if you don't bite them. But dogs sometimes bite them! We once lost a very valuable and large male Great Pyrenees because he chose to bite a Buffo. When we sold the house we thought the people bought it because they loved the landscaping.
Everyone in the neighborhood loved the landscaping and people use to visit often just to see our "jungle". Apparently the new owners lost a small dog to a Buffo Toad. One of my old neighbors called me almost crying and told me they had cut down everything! Everything including the palms and concreted the entire back yard. They did it in an effort to keep the Buffo Toads away. Silly thing to do since the toads live in Biscayne National Park and will come in the yard if you have a jungle or nothing but concrete. When they lost the second dog they sold the house! I looked it up recently on a satellite photo and it is nothing but 1/3 acre of concrete with a pool in the center! Shame. If you build a backyard rainforest you will have to learn to accept your new "resident neighbors"! To borrow a line from a movie, if you build it, they will come!
You cannot imagine the joy of seeing a white layer of snow on the ground while being in a semi-clear building with blooming orchids, rare tropical plants and a temperature still 80 degrees in the day!
Go ahead. Don't let anyone tell you it can't be done. Build a rain forest.
Still have questions? We have associates that can help you design and build the structure as well as provide the plants.
Steve Lucas
Steve@ExoticRainforest.com
www.ExoticRainforest.com
TROPICAL GREENHOUSE PROJECT: HOW I MADE WARM AND COOL ZONES IN THE GREENHOUSE
Video :
Greenhouse design principles :
- Theory of operation :
From Wikipedia - Click here to read more ..
The warmer temperature in a greenhouse occurs because incident solar radiation passes through the transparent roof and walls and is absorbed by the floor, earth, and contents, which become warmer. As the structure is not open to the atmosphere, the warmed air cannot escape via convection, so the temperature inside the greenhouse rises. This differs from the earth-oriented theory known as the "greenhouse effect".
Quantitative studies suggest that the effect of infrared radiative cooling is not negligibly small, and may have economic implications in a heated greenhouse. Analysis of issues of near-infrared radiation in a greenhouse with screens of a high coefficient of reflection concluded that installation of such screens reduced heat demand by about 8%, and application of dyes to transparent surfaces was suggested. Composite less-reflective glass, or less effective but cheaper anti-reflective coated simple glass, also produced savings.
Ventilation :
Ventilation is one of the most important components in a successful greenhouse, especially in hot and humid tropical climate condition.[17][18] If there is no proper ventilation, greenhouses and their growing plants can become prone to problems. The main purposes of ventilation are to regulate the temperature, humidity and vapor pressure deficit [19] to the optimal level, and to ensure movement of air and thus prevent build-up of plant pathogens (such as Botrytis cinerea) that prefer still air conditions. Ventilation also ensures a supply of fresh air for photosynthesis and plant respiration, and may enable important pollinators to access the greenhouse crop.
Ventilation can be achieved via use of vents - often controlled automatically via a computer - and recirculation fans.
Heating :
Heating or electricity is one of the most considerable costs in the operation of greenhouses across the globe, especially in colder climates. The main problem with heating a greenhouse as opposed to a building that has solid opaque walls is the amount of heat lost through the greenhouse covering. Since the coverings need to allow light to filter into the structure, they conversely cannot insulate very well. With traditional plastic greenhouse coverings having an R-value of around 2, a great amount of money is therefore spent to continually replace the heat lost. Most greenhouses, when supplemental heat is needed use natural gas or electric furnaces.
Passive heating methods exist which seek heat using low energy input. Solar energy can be captured from periods of relative abundance (day time/summer), and released to boost the temperature during cooler periods (night time/winter). Waste heat from livestock can also be used to heat greenhouses, e.g., placing a chicken coop inside a greenhouse recovers the heat generated by the chickens, which would otherwise be wasted.[citation needed] Some greenhouses also rely on geothermal heating.[20]
Electronic controllers are often used to monitor the temperature and adjusts the furnace operation to the conditions. This can be as simple as a basic thermostat, but can be more complicated in larger greenhouse operations.
Carbon dioxide enrichment
The possibility of using carbon dioxide enrichment in greenhouse cultivation to enhance plant growth has been known for nearly 100 years.[21][22][23] After the development of equipment for the controlled serial enrichment of carbon dioxide, the technique was established on a broad scale in the Netherlands.[24] Secondary metabolites, e.g., cardiac glycosides in Digitalis lanata, are produced in higher amounts by greenhouse cultivation at enhanced temperature and at enhanced carbon dioxide concentration.[25] Commercial greenhouses are now frequently located near appropriate industrial facilities for mutual benefit. For example, Cornerways Nursery in the UK is strategically placed near a major sugar refinery,[26] consuming both waste heat and CO2 from the refinery which would otherwise be vented to atmosphere. The refinery reduces its carbon emissions, whilst the nursery enjoys boosted tomato yields and does not need to provide its own greenhouse heating.
Enrichment only becomes effective where, by Liebig's law, carbon dioxide has become the limiting factor. In a controlled greenhouse, irrigation may be trivial, and soils may be fertile by default. In less-controlled gardens and open fields, rising CO2 levels only increase primary production to the point of soil depletion (assuming no droughts,[27][28][29] flooding,[30] or both[31][32][33][34][35]), as demonstrated prima facie by CO2 levels continuing to rise. In addition, laboratory experiments, free air carbon enrichment (FACE) test plots,[36][37] and field measurements provide replicability.[38][39][40]


A plastic air-insulated greenhouse in New Zealand
Recreational Greenhouse at Palazzo Parisio, Malta.
Giant greenhouses in the Netherlands
GreenHouse History :
My own little winter paradise!
The Nash House at Kew Gardens, London, England, is one of the oldest fully glazed greenhouses still standing. It dates back to 1825. The massive structure was needed to support the weight of heavy glass panels on the roof and walls.
A BRIEF HISTORY OF THE GREENHOUSE
courtesy to : laidbackgardener.blog/2016/01/27/a-brief-history-of-the-greenhouse/


What gardener doesn’t dream of owning his or her own greenhouse? I have had mine for over 25 years. It’s actually a solarium that I fill with plants in the winter and which becomes our dining room in the summer when most of plants are outdoors. Honestly, I can’t imagine living without it!
But greenhouses are nothing new: we can even trace their history back to Roman times.
The Romans
The first attempts to grow plants under cover probably date back to ancient Egypt, but not much is known about how this was done. By Roman times, however, there are writings that clearly explain their operation.
The first notes about greenhouses can be traced to the reign of Tiberius, Roman emperor from 14 to 37 CE. It seems he wanted to eat fresh cucumbers all the year long, but that wasn’t possible in Rome, where winter temperature are cold and can even drop below freezing.
His gardeners first tried to install cucumber plants on carts so they could drag them into sheds when it became too cold. But if the cold lasted more than a few days, the cucumbers would start to die from lack of light. But someone came up with the idea of covering the structures not with slate, but sheets of selenite, a transparent rock, to let the sun in. These are the first greenhouses for which we have any clear record.
Renaissance Greenhouses
The Orto Botanica di Padova (Padua, Italy) is the world’s oldest botanic garden, dating back to 1545. Note the orangery to the right.
Starting in the 13th century, new techniques made it easier to make panels of glass and by the Renaissance, from the 14th to the 17th century, larger and larger structures with glass windows were being made.
This was a great period of exploration and plants were being brought back from exotic locations: Africa, the Middle East, Asia and, even later, the New World. These tender plants summered outdoors, but would be brought indoors into large greenhouses called orangeries. They got their name because even large fruit trees – orange trees, lemon trees, date palms, etc. – could be overwintered there.
Thus were the first botanical gardens born, first in Italy and then throughout Europe. Originally they were linked to the faculty of medicine of a university, for botany was at the time considered an integral part of medicine.
In southern Europe, a roof or a wall of windows was enough to keep plants warm over the winter, because of the greenhouse effect. The sun warms the interior during the day and enough heat is held captive by the glass to keep the orangery warm throughout the night, even in winter. Further north, however, passive heating simply wasn’t sufficient. Special heating systems were therefore developed to keep the orangeries toastier.
The orangery at Versailles.
At Versailles, the huge 150 m (492 ft) long orangery, built between 1684 and 1686, was designed to contain 1000 orange trees and other subtropical fruits grown in large crates when they were moved indoors over the winter. It was heated by coal furnaces. The heating system was so inefficient that some plants froze, others baked, most were quickly covered in soot and many would be half dead by spring.
Of course, orangeries don’t quite fit our modern image of a greenhouse, as they have a solid roof and walls. Only the large doors through which the plants were brought indoors in the fall and out again in the spring were glazed. The orangery of Versailles wasn’t actually developed with much thought about letting the sun in: it is located under a terrace and doesn’t even face south, but rather northwest! So much for taking advantage of the greenhouse effect!
In the nineteenth century, European countries abolished taxes on glass windows and they suddenly became much more popular. Houses started to have more and much larger windows and the first modern greenhouses, fully glazed, appeared. And greenhouses were also no longer the sole preserve of botanical institutions: it became very fashionable to add a small greenhouse to any major house. Such a structure would be called a winter garden or conservatory.
In the winter gardens of large estates, it became fashionable to grow exotic plants: ferns, orchids, palms and others, something to impress visitors.
The same estate would have also have had one or more glasshouses (horticultural greenhouses), also called hothouses, separate from the house itself, for the cultivation of vegetables, flowers, and fruits, as it was considered appropriate at the time for every rich landowner to produce his own oranges, bananas and pineapples for the table of his guests, not to mention cut flowers to decorate vases all winter.
The famous greenhouses at Longwood Gardens (Pennsylvania) began their life as simple hothouses for nectarines, figs, grapes, and cut flowers… before expanding into something much, much more. And the home itself, the Peirce-Dupont house, has a very large conservatory built right into it. Visit just about any historic estate and there will be long rows of glasshouses out near the vegetable garden… or at least, the traces of the foundations will still be there, as sadly many of them are no longer being maintained.
The nineteenth century was also the era of grand public greenhouses, such as the Jardin d’hiver on the Champs-Elysées in Paris (1846) and Crystal Palace in London (1851), both of which served not only to wow people with new exotic plants, but were also the convention centers of their time. These two enormous greenhouses no longer exist, but many European, North American and Australian cities still have one or even several large
Victorian-era public greenhouses: Paris, London, Dublin, St. Petersburg, New York, San Francisco, Toronto, Montreal, Adelaide, etc.
Greenhouse Therapy
London’s Crystal Palace.
Escaping winter in the Montreal Botanical Gardens’ vast greenhouse complex.
If you just can’t stand winter anymore and a trip to Cancun is not in your budget, why not escape to a public greenhouse for an hour or two? Their tropical heat, humid atmosphere, deliciously earthy scents and abundance of plants of all shapes and colors is guaranteed to perk you up. If there is no public greenhouse in your city, try a local garden center: there is bound to be one that is open year round and they cost nothing to visit.
Personally, I use my own greenhouse for therapeutic purposes. Whenever I feel down or a bit off, I slip off to the greenhouse and muddle about for a few minutes, then, my batteries recharged, off I go, back to work. This is almost an automatism. I sometimes find myself in the greenhouse without even remembering having gotten up from my desk: it’s as if my body knew it needed a break and just took over!
Who knows? Perhaps there will be a beautiful “winter garden” in your future too! Keep your fingers crossed!
Other Websites :
- en.wikipedia.org/wiki/Greenhouse
- www.yearofthedurian.com/2014/09/tropical-greenhouse-in-ohio-usa.html
- www.coolgarden.me/tips-for-growing-tropical-plants-in-the-garden-greenhouse-993/
- ahousemouse.blogspot.ae/2012/09/botanical-gardens-in-glasgow-scotland.html
- www.gardeningknowhow.com/special/greenhouses/plants-for-greenhouses.htm
- www.greenhousegrower.com/technology/new-greenhouse-cooling-system-in-development-for-hot-climate-regions/
- www.instructables.com/id/Greenhouse-Modifications-for-Hot-Climates/
Greenhouse Design ,Construction and DIYs
PROJECT One :Building a Low-Cost Greenhouse
PROJECT Two : GREENHOUSE MODIFICATIONS FOR HOT CLIMATES
PROJECT Three : 25 DIY Greenhouse Plans You Can Build On A Budget
PROJECT Four : Underground Greenhouse
PROJECT Five : Orchid Greenhouse
Greenhouse Design ,Construction and DIYs
PROJECT One :Building a Low-Cost Greenhouse
PROJECT Two : GREENHOUSE MODIFICATIONS FOR HOT CLIMATES
PROJECT Three : 25 DIY Greenhouse Plans You Can Build On A Budget
PROJECT Four : Underground Greenhouse
PROJECT Five : Orchid Greenhouse