Very clear photos for the vivariums , voids up and the plants and the vivariums side .. .
Below the acrylic sheet ( Clear 6 mm ) will be installed - One side will be full sheet and other will be sliding for access ..
Electrical :
lighting as I mention before will be internal type in hoods or containers with holders


Unfortunately Ihave only these photos for the lighting hoods .. I forget to photo the process of the lighting hood fabrication .. but is just rectangular wood container and covered by chiken wire to avoid any touch between the animals and the holt light bulb ..
All wires will run through this pipe in the vivariums side .. This side also is covered by liner for protection .. in the external side .. You will know that later ..
:-)

Decoration :
I used some old materials from the corner vivarium - Like old foan stuff produced after shaping the foam .. The pots after I planted the plants .. Old decoration materials from the tortoises temporary cage ..
pots and foam are used .. firstly attach the pots to the wall of the vivariums , also pieces of the foam .. you can add some woods and stems ..
make sure to not distrub the light which must to go through the vivarium to the bottom
the plants should be face the direct light ..
decoration depend on you imagination and skills ..
I advise you to look to the natural origin tropical areas photos .. watch movies about the herpetology .. read books ..


I used also some aquarium drift wood that I ordered for the previous project ( The corner three vivariums )
Using the same mixture of cement ( normal black cement ) with cement color and also potting soil .. Half to half ..
Spray some dry soil on the wet cement to get the aesthetic effect and also the wet brush to wipe and beautify the scattered blocks of cement to look more natural .. You can also add color to the corners and deep digging using long brushes .. Try to hide everything in brown and not show any Part of cork or filler material used ..


Plants and misting system - nozzle added ..
Bambo woods - see also the finishing of the walls ..
Doors for the void added .. You can see how just have a look to the first project of 2017 - The corner vivarium
Acrylic sheet with protective kraft paper will be removed after that just to protect the acrylic from any scratch ..
Lower side will be by chicken wire for ventilation as I mentioned before ..
This time the pots will be the bottles ( 1 liter size ) the opening of the bottle will be the drain ..
The side of the Vivariums : The side of the cabinet will be as a piece of the tropical wall or roots .. I will put pots and drain system with drain collection chamber in the bottom .. light and one sprinkler ..


I put normal pot also with bottle down -thyen to the drain pipe ..

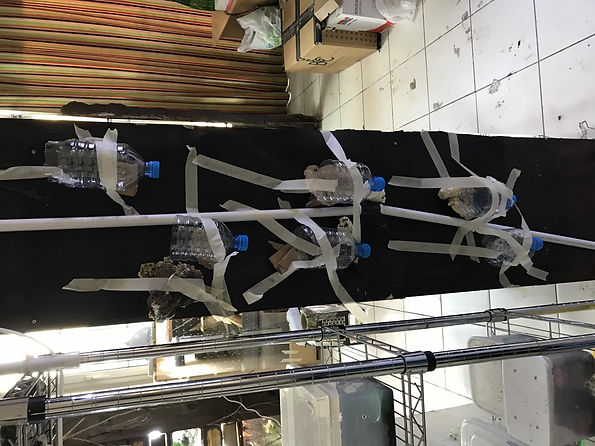
The liner on the side of the cabinet attached for the protection then the bottles - pot attached by using maskin tape only ..
I put the pipes coonections and I use half inch size pipes and fittings
The bottles - pots connected and glue by UPVC cement ..
Makin tape used to attach all these ..
Need time and efforts because it is not to easy and I dont want to screw the liner to fix abything because the water may be leak to the wood and dange the vivarium cabinet itself ..
This a clen - out this cab is removable and can be removed easly to clen and open the pipe if it is block ..
In the bottom the pipe will open here in this chamber .. Actually I think about this when I found this foam or polysterene box ..
I put small pieces of foam or polysterene as a stuff befor foam applied


Animals inside ..


PROJECT One : Corner Vivariums : PART 1 PART 2 PART 3 PART 4 PART 5
PROJECT Two : Clothes cabinet to vivarius project : PART ONE PART TWO
PROJECT Three : Themed stands or racks : PART 1 PART 2
PROJECT Four : Wood Vivariums :
Project 1 : Part one Desert vivarium for Arabian uromastyx
: part two Desert vivarium for Arabian uromastyx
Project 2 :- General tropical vivarium
Project 3: - Wood Vivarium : calotes mystaceus enclosure
Project 4 : - Large Tropical Vivarium : The Boa vivarium : PART ONE PART TWO
Project 5 :- Tropical Vivarium : The chameleon vivarium
Project 6 :- Tropical Vivarium :Cuban Anole vivarium